Test Automation using Protractor, Jasmine, and JavaScript
Today we will be setting up a test framework using one of the famous JavaScript tool named Protractor and Jasmine with JavaScript as the programming language.

Today we will be setting up a test framework using one of the famous JavaScript tool named Protractor and Jasmine with JavaScript as the programming language.
WHAT IS PROTRACTOR?
Protractor is an end-to-end test framework for Angular and AngularJS applications. Protractor runs tests against your application running in a real browser, interacting with it as a user would.
Reference: https://www.protractortest.org
WHAT IS JASMINE?
Jasmine is a behavior-driven development framework for testing JavaScript code.
Reference: https://jasmine.github.io/
Lets go through step by step process of creating automation framework using Protractor, Jasmine, and JavaScript. At the end of this tutorial, you will be having knowledge of setting up the framework from scratch. Follow below steps one by one, and if you know any step you can skip it and move to next:
Step 1) Install Node.JS
Step 2) Install Visual Studio Code
Step 3) Open Visual Studio Code
Step 4) Create a folder named protractor-jasmine-javascript
Step 5) Create a file named .gitignore and add below content
screenshots/
testResults/
node_modules/
.vscode
.idea
*.log
Step 6) Create a file named package.json and add below content
{
  "name": "protractor-jasmine-javascript",
  "version": "1.0.0",
  "description": "This is Test Automation framework designed using Protractor, Jasmine and JavaScript",
  "homepage": "https://github.com/codewithmmak/protractor-jasmine-javascript",
  "main": "conf.js",
  "dependencies": {
    "jasmine": "^4.2.0",
    "protractor": "^7.0.0",
    "protractor-beautiful-reporter": "^1.3.6"
  },
  "devDependencies": {
    "@types/jasmine": "^4.0.3",
    "@types/jasminewd2": "^2.0.10",
    "randomstring": "^1.2.2",
    "rimraf": "^3.0.2",
    "yargs-parser": "^21.0.1"
  },
  "scripts": {
    "clean": "rimraf temp/ && rimraf download/",
    "pretest": "npm run clean",
    "test": "protractor conf.js",
    "webdriver-update": "node node_modules/protractor/bin/webdriver-manager update"
  },
  "keywords": [
    "protractor",
    "jasmine",
    "javascript",
    "angular",
    "angularjs",
    "vscode",
    "testing",
    "selenium",
    "webdriverJS",
    "automation testing"
  ],
  "author": "Code with MMAK",
  "license": "MIT",
  "repository": {
    "type": "git",
    "url": "https://github.com/codewithmmak/protractor-jasmine-javascript.git"
  }
}
Step 7) Now go to your Project root directory which is protractor-jasmine-javascript and install dependency by running the command.
npm install --save jasmine protractor protractor-beautiful-reporterIgnore any warning you see.
Step 8) Now install dev dependency by running the command
npm install --save-dev @types/jasmine @types/jasminewd2 randomstring rimrafIgnore any warning you see.
Step 9) Create a file named conf.js and add below content
// Require protractor-beautiful-reporter to generate reports.
var HtmlReporter = require('protractor-beautiful-reporter');

exports.config = {

	directConnect: true,

	// Capabilities to be passed to the webdriver instance.
	capabilities: {
		'browserName': 'chrome',
		chromeOptions: {
			args: ['--disable-gpu']
		}
	},

	// If you have one app to test then you can mention the base url here.
	// baseUrl: 'https://juliemr.github.io/protractor-demo/',

	// Framework to use. Jasmine2 is recommended.
	framework: 'jasmine2',

	// Spec patterns are relative to the location of the spec file. They may include glob patterns.
	specs: [
		"test-suites/*/*.spec.js",
	],

	// Options to be passed to Jasmine-node.
	jasmineNodeOpts: {
		showColors: true,
		defaultTimeoutInterval: 90000,
		isVerbose: true
	},

	onPrepare: () => {
		browser.manage().window().maximize();
		browser.manage().timeouts().implicitlyWait(5000);

		// Add a screenshot reporter and store screenshots to `./test-results`:
		jasmine.getEnv().addReporter(new HtmlReporter({
			baseDirectory: 'test-results',
			preserveDirectory: false, // Preserve base directory
			screenshotsSubfolder: 'screenshots',
			jsonsSubfolder: 'jsons', // JSONs Subfolder
			takeScreenShotsForSkippedSpecs: true, // Screenshots for skipped test cases
			takeScreenShotsOnlyForFailedSpecs: false, // Screenshots only for failed test cases
			docTitle: 'Test Automation Execution Report', // Add title for the html report
			docName: 'TestResult.html', // Change html report file name
			gatherBrowserLogs: true // Store Browser logs
		}).getJasmine2Reporter());
	}
};
Step 10) Create a folder named page-objects
Step 11) Create a file named angularjs.helper.js and add below content
var angularjsHelper = function () {

    var nameInput = element(by.model('yourName'));
    var greeting = element(by.binding('yourName'));

    var enterToDoText = element(by.model('todoList.todoText'));
    var addButton = element(by.xpath('//input[@type="submit"]'));
    var toDo = element(by.xpath('html/body/div[2]/div[3]/div[2]/div[2]/div/ul/li[3]/label/span'));
    var remaining = element(by.xpath('html/body/div[2]/div[3]/div[2]/div[2]/div/span'));
    var selectToDoItem = element(by.xpath('html/body/div[2]/div[3]/div[2]/div[2]/div/ul/li[3]/label/input'));
    var remaining2 = element(by.xpath('html/body/div[2]/div[3]/div[2]/div[2]/div/span'));
    var archiveLink = element(by.linkText('archive'));
    var lastToDoItem = element.all(by.css('.checkbox span')).last();
    var selectLastToDoItem = element.all(by.css('.checkbox input')).last();

    this.get = async () => {
        await browser.get('https://angularjs.org');
        console.log('User is navigated to Angular JS site');
    };

    this.setName = async (name) => {
        await nameInput.sendKeys(name);
        console.log('Set Name Text');
    };

    this.getGreeting = async () => {
        return await greeting.getText();
        console.log('Got Greeting Text');
    };

    this.setToDoText = async (toDoText) => {
        await enterToDoText.sendKeys(toDoText);
        console.log('Set ToDo Text');
    };

    this.addButton = async () => {
        await addButton.click();
        console.log('Clicked Add button');
    };

    this.getToDoText = async () => {
        return await toDo.getText();
        console.log('Got ToDo Text');
    };

    this.getRemainingItemText = async () => {
        return await remaining.getText();
        console.log('Got remaining item Text');
    };

    this.selectToDoItem = async () => {
        await selectToDoItem.click();
        console.log('Clicked on To Do item');
    };

    this.getRemaining2 = async () => {
        return await remaining2.getText();
    };

    this.clickArchiveLink = async () => {
        await archiveLink.click();
        console.log('Clicked on Archive link');
    };

    this.getLastToDoItemText = async () => {
        var last = await lastToDoItem.getText();
        console.log('Last ToDo Item is: ' + last);
        return last;
    };

    this.selectLastToDoItem = async () => {
        return await selectLastToDoItem.click();
        console.log('Selected last ToDo item');
    };

};

module.exports = angularjsHelper
Step 12) Now create a folder named test-suites
Step 13) Create a file named enter-name.spec.js and add below content
var EnterNamePage = require('../../page-objects/angular-js/angularjs.helper.js');

describe('AngularJS Website Test: ', function () {

	it('As a user, I should be able to enter a Name', function () {
		var enterNamePage = new EnterNamePage();
		enterNamePage.get();
		enterNamePage.setName('QA Loop');
		expect(enterNamePage.getGreeting()).toEqual('Hello Code with MMAK!');
	});
});
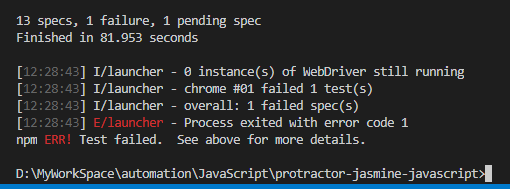
Step 14) Now to run the test open terminal and type below command

I’ve some extra test as a sample in the framework for practice, that’s why you are seeing 13 specs in the above image.
Also, you will get html report, which is generated in test-results folder using protractor-beautiful-reporter

CODE REPOSITORY
The sample framework is hosted on GitHub: protractor-jasmine-javascript
Have a suggestion or found a bug? Fork this project to help make this even better.
Star the repo and follow me to get latest updates
WHAT DO YOU THINK?
Did this work for you?
Could I have done something better?
Have I missed something?
Please share your thoughts using comments on this post. Also, let me know if there are particular things that you would enjoy reading further.
Cheers!

