
With increasing changes in testing patterns, automation testing frameworks available in the market have risen significantly. Selenium has been in the market for almost a decade, but tools such as Playwright and Cypress are evolving daily.
Every tool has pros and cons; however, Playwright execution speed is faster because it uses WebSocket instead of WebDriver API and HTTP. During test execution, WebSocket stays open, so everything is sent over a single connection.
Playwright assertions take care of test flakiness and have an inbuilt retry mechanism. It uses the expect library from Jest for test assertions. The expect library gives you access to several “matchers” that validate different conditions like toBeChecked, toBeVisible, toContainText, toBeVisible, toHaveText, etc. Playwright assertions default timeout is set to 5 seconds.
In this Playwright tutorial, we will look into these Playwright assertion types in much more detail.
Let’s quickly look into what test assertions are and a quick recap of the Playwright automation framework.
What are Test Assertions?
An assertion is a part of the test automation process where you compare/match the actual outcome with the expected outcome. This means checking to verify that the application’s state is what we expect.
Let’s say John wants to purchase a product by navigating to a website by clicking on the Category menu and then clicking on the Category, selecting the product, adding to the cart, checkout, and making the payment. We will look into this example step-by-step using LambdaTest eCommerce Playground.
Step-by-step test approach
| Step No# | Action | Verification |
| 1 | Navigate to eCommerce Playground Website. | Verify the user is navigated to the eCommerce website. Verify page title is Your Store. |
| 2 | Click on Shop by Category. | Verify Shop by Category menu is visible. Verify Top categories is shown to the user. |
| 3 | Click on the Components category. | Verify the user is redirected to the Components page Verify the page title is ‘Components’ Verify ‘HTC Touch HD’ is shown in the list. |
| 4 | Click on the first product, ‘HTC Touch HD’ | Verify the user is navigated to the ‘HTC Touch HD’ product details page. Verify page title is ‘HTC Touch HD’ Verify Availability is shown as ‘In Stock’ Verify the ‘ADD To CART’ button is enabled. |
| 5 | Click on the ‘ADD To CART’ button. | Verify product is successfully added to the cart. |
| 6 | Click on the ‘Cart’ icon. | Verify the Cart side panel is open Verify the Checkout button is shown to the user |
| 7 | Click on the ‘Checkout’ button. | Verify the user is redirected to the Checkout page. Verify product details are shown in the right side pane. Since you didn’t log into the application on the right-hand side, you will also see the Registration/Login/Guest flow. |
In the above example, you can see how you can add assertions for each state of the page and transition. You can always add an assertion in such a way it is raised whenever there are issues/errors in the user journey. In the following sections, you will learn more about Playwright and different types of Playwright assertions.
Quick Recap of Playwright
Playwright is a test automation tool for end-to-end testing for any modern web application like react.js or AngularJS. It’s a Node.js library to automate Chromium, Firefox, and WebKit with a single API. Any browser built on top of these browser engines you will be able to automate. It’s free, open source, and built by Microsoft.

At the time of writing this blog, it has over 47.4k Star, 2.3k Fork, and 371 contributors on GitHub, which speaks to how popular the tool is and fast growing.
A survey by the State of JS 2021 for the popular testing libraries shows that Playwright is one of the popular tools with an almost 100% retention rate.

It also supports all the major platforms of Windows, Linux, and Mac OS. You have very good support for all the programming languages like TypeScript, JavaScript, Python, .Net, and Java.
It also supports automation on real mobile devices as well as emulators & simulators.
You can run the Chrome browser on Android or Safari on iPhone/iPad and conduct your test.
Getting started with Playwright Assertions
Before we get into actual Playwright assertions, let’s quickly set up the Playwright framework and run the example tests to see tests in action. Further, we will use it to create a working example code. If you have already installed Playwright on your device, you can proceed directly to the next section on Playwright assertions.
Step 1: You need to have Node.js installed on your machine. You can download it directly from the Node.js website and install it on your machine if you are not already using it.
Once installed, check the version:
node -v

Step 2: Download and Install Visual Studio Code (this will help you write formatted code, but you can pick any text editor of your choice).
Step 3: Open Visual Studio Code.
Step 4: Open your integrated terminal and run the following command.
mkdir playwright-lambdatest-javascript

Step 5: Open the directory.
cd playwright-lambdatest-javascript

Step 6: Create a new package.json file with default values.
npm init -y
Your package.json file should be like this:
{
“name”: “playwright-lambdatest-javascript”,
“version”: “1.0.0”,
“description”: “”,
“main”: “index.js”,
“scripts”: {
“test”: “echo \”Error: no test specified\” && exit 1″
},
“keywords”: [],
“author”: “”,
“license”: “ISC”
}

Step 7: Install the Playwright.
You can install Playwright using npm or yarn, and another way is by VS Code Extension.
In this blog, we will install the Playwright using the npm command. On your terminal, type:
npm init playwright@latest
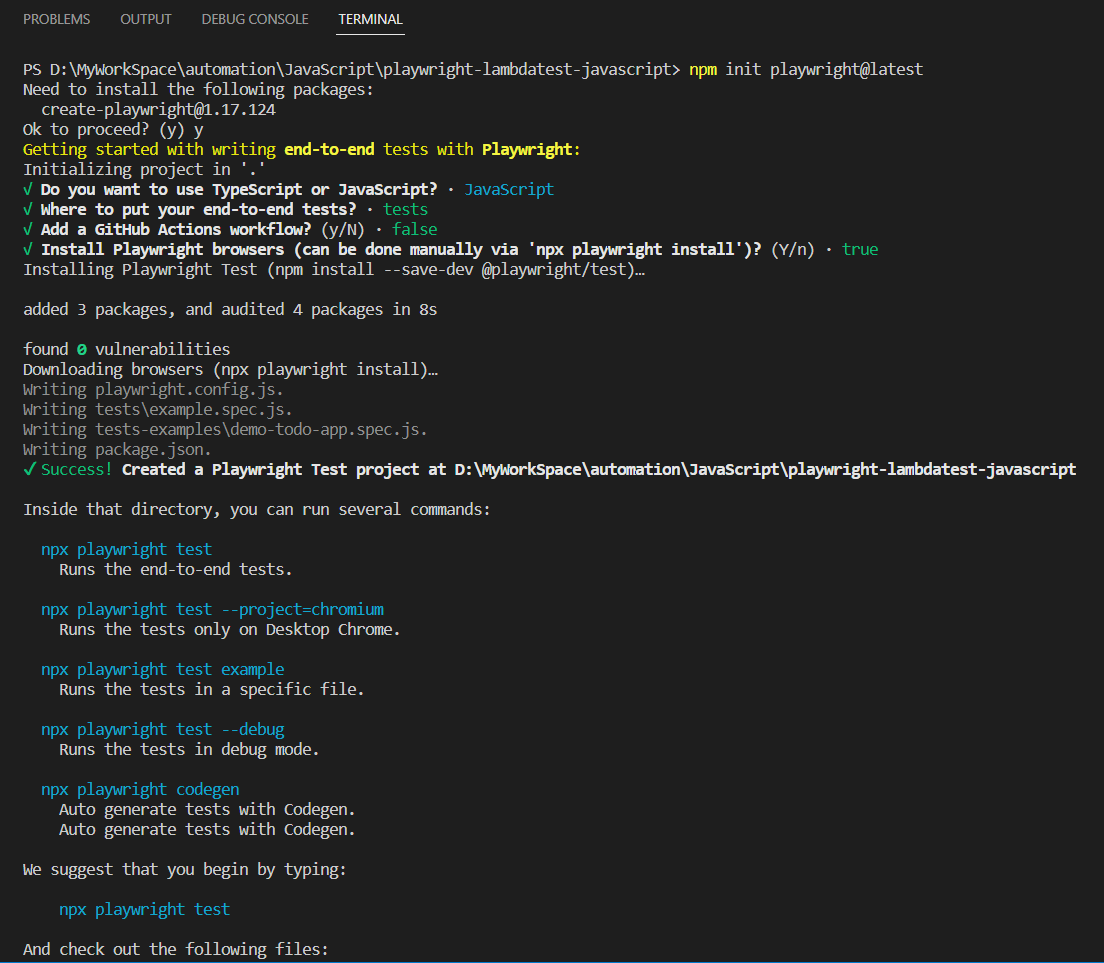

Running the Example Test
Since we have installed Playwright with default options, it created an example spec file named example.spec.js under the tests folder.

Let’s run the test:
npx playwright test

playwright.config.js is the configuration file, which is set to run the tests on three browsers, Chromium, Firefox, and WebKit, in the headless mode. It will also generate a default HTML report, and you can open index.html from playwright-report.

You can also open the report by running the following command on the terminal to open the report from the default location, and it will open the same report.
npx playwright show-report

Delete example.spec.js, as we will add new tests while you are following this guide.
Deep Diving into Playwright Assertions
While testing a condition, you want different ways to assert, and Playwright makes this possible much simpler by using expect. It’s a feature that allows you to assert the state of a web page or an element within a web page.
This can include checking the text content of an element, the value of an input field, or the presence of a specific CSS class. You can learn more about it through this blog on locator strategies.
Since you already know what expect is, let’s now look at different Playwright assertions.
| Assertions | Description |
| expect(locator).toBeChecked() | Expect to verify Checkbox is checked |
| expect(locator).toBeDisabled() | Expect to verify Element is disabled |
| expect(locator).toBeEditable() | Expect to verify Element is enabled |
| expect(locator).toBeEmpty() | Expect to verify the Container is empty |
| expect(locator).toBeEnabled() | Expect to verify Element is enabled |
| expect(locator).toBeFocused() | Expect to verify Element is focused |
| expect(locator).toBeHidden() | Expect to verify Element is not visible or hidden |
| expect(locator).toBeVisible() | Expect to verify Element is visible |
| expect(locator).toContainText() | Expect to verify Element contains text |
| expect(locator).toHaveAttribute() | Expect to verify Element has a DOM attribute |
| expect(locator).toHaveClass() | Expect to verify Element has a class property |
| expect(locator).toHaveCount() | Expect to verify a List has the exact number of children |
| expect(locator).toHaveCSS() | Expect to verify Element has CSS property |
| expect(locator).toHaveId() | Expect to verify Element has an ID |
| expect(locator).toHaveJSProperty() | Expect to verify Element has a JavaScript property |
| expect(locator).toHaveScreenshot() | Expect to verify Element has a screenshot |
| expect(locator).toHaveText() | Expect to verify Element matches text |
| expect(locator).toHaveValue() | Expect to verify Input has a value |
| expect(locator).toHaveValues() | Expect to verify Select has options selected |
| expect(page).toHaveScreenshot() | Expect to verify Page has a screenshot |
| expect(page).toHaveTitle() | Expect to verify Page has a title |
| expect(page).toHaveURL() | Expect to verify Page has a URL |
| expect(apiResponse).toBeOK() | Expect to verify Response has an OK status |
We will be using Selenium Grid to execute the test on LambdaTest. You need to import lambdatest-setup, which you can find on my GitHub Repo, along with all the examples in this guide.
Negative Matchers
Negative matchers are used when you want to verify certain conditions are not matched. It’s a kind of verification opposite to the true condition:
Example:
const { test } = require(“../lambdatest-setup”);
const { expect } = require(“@playwright/test”);
test(‘Negative matchers test’, async ({ page }) => {
await page.goto(‘https://ecommerce-playground.lambdatest.io’);
await expect(page.getByText(‘Top Category’), ‘top category text should not be visible’).not.toBeVisible();
});
Walkthrough:
Line 6: not.toBeVisible() is not a negative matcher. It’s to verify cases that are not true.
I will explain the complete code in the Playwright Locator Assertions section.
Execution:

Soft Assertions
When several verification steps need to be added on a page, or some are less important, you don’t want test execution to stop when a certain condition is not matched, or an assertion fails.
In soft Playwright assertion, you are just verifying some condition, and it doesn’t interrupt the whole execution if the condition is not satisfied but marks the test as failed. Soft assertions only work with the Playwright test runner.
Example:
Walkthrough:
Line 6: You will find expect.soft, even if the condition fails. However, execution will continue with the next step.
const { test } = require(“../lambdatest-setup”);
const { expect } = require(“@playwright/test”);
test(‘Soft assertion test’, async ({ page }) => {
await page.goto(‘https://ecommerce-playground.lambdatest.io’);
await expect.soft(page.getByText(‘Top Category’), ‘top category should be visible’).toBeVisible();
await expect(page).toHaveTitle(“Your Store”);
});
Line 7: It’s a hard assertion. If the condition doesn’t match, the test will be marked as failed, and execution will be stopped. The hard Playwright assertion will be simply written as expect, unlike the soft Playwright assertion.
You can read this blog on Soft and Hard Asserts to learn more about them.
Execution:


In the HTML report, you will see only X for the soft Playwright assertion, and it continued with the remaining tests and verified the expected condition, which passed.
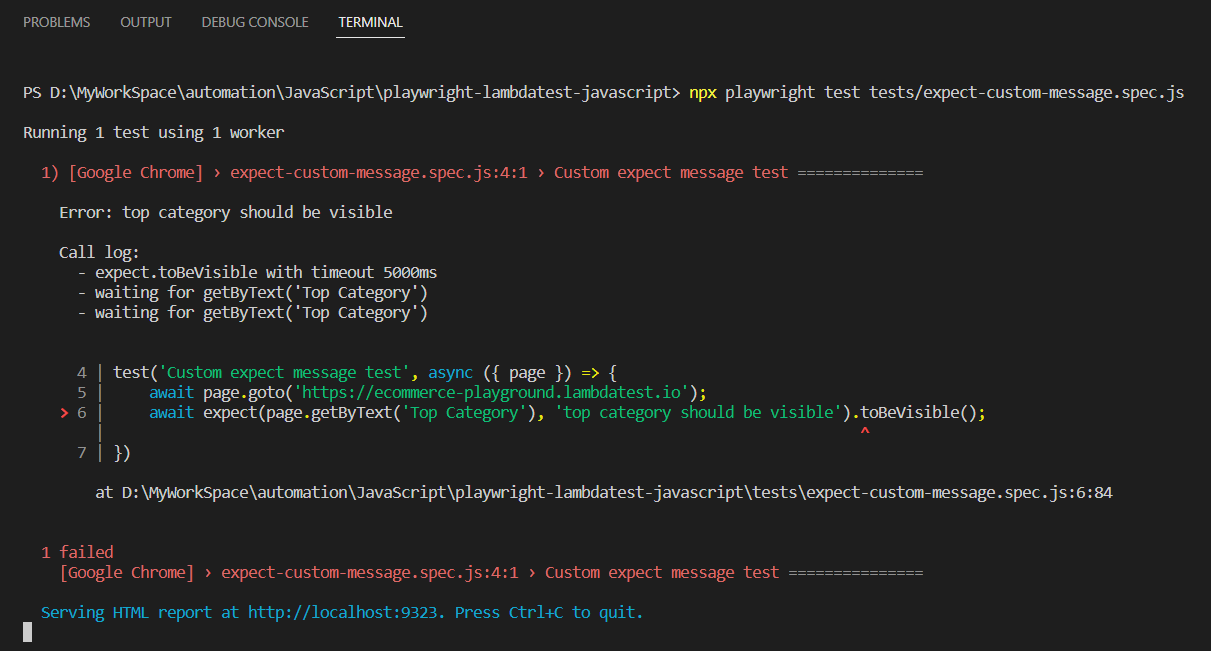
Custom Expect Message
With the failure when you want to show a custom error message while doing expect or verification, we use a custom expect message.
Implementation:
const { test } = require(“../lambdatest-setup”);
const { expect } = require(“@playwright/test”);
test(‘Custom expect message test’, async ({ page }) => {
await page.goto(‘https://ecommerce-playground.lambdatest.io’);
await expect(page.getByText(‘Top Category’), ‘top category should be visible’).toBeVisible();
});
Code Walkthrough:
Line 6: You will find the ‘top category should be visible’ custom error message, which will be printed when the condition doesn’t satisfy.
The console will show the following error:
Expect Polling
Use expect from @playwright/test to check the state of a UI element, such as visibility or text content. If the expectation doesn’t pass immediately, use expect.poll to wait for the desired state to be reached.
Polling converts any synchronous expect to an asynchronous expect.poll.
To demonstrate expect.poll example, we will be using the LambdaTest Platform API.
Implementation:
const { test } = require(“../lambdatest-setup”);
const { expect } = require(“@playwright/test”);
test(‘Fetch platform along with browsers and version supported using Playwright Expect Poll test’, async ({ page }) => {
await expect.poll(async () => {
const response = await page.request.get(‘https://api.lambdatest.com/automation/api/v1/platforms’);
return response.status();
}, {
message: ‘Response was either not 200 or timeout’,
timeout: 10000,
}).toBe(200);
});
Code Walkthrough:
Line 4: expect.poll is like a wait.
Line 9: It’s a custom error message you want to log.
Line 10: It waits for 10 seconds. If not, it will time out. The default poll is 5 seconds. You need to pass 0 in case you don’t want to timeout
Execution:

Custom Polling Intervals
You can also specify the custom polling intervals. Probe, wait 2 seconds, probe, wait 4 seconds, probe, wait 10 seconds, probe, wait 10 seconds. Default intervals are [100, 250, 500, 1000].
Implementation:
const { test } = require(“../lambdatest-setup”);
const { expect } = require(“@playwright/test”);
test(‘Custom Polling test’, async ({ page }) => {
await expect.poll(async () => {
const response = await page.request.get(‘https://api.lambdatest.com/automation/api/v1/platforms’);
return response.status();
}, {
message: ‘Response was either not 200 or timeout’,
intervals: [2_000, 4_000, 10_000],
timeout: 60000,
}).toBe(200);
});
Code Walkthrough:
Line 10: It polls with intervals specified like [2_000, 4_000, 10_000] (mentioned in ms)
Execution:

Expect Retrying
If the expected condition doesn’t match then it is going to retry till its timeout (default ~ 30000ms).
Implementation:
const { test } = require(“../lambdatest-setup”);
const { expect } = require(“@playwright/test”);
test(‘Expect Retry test’, async ({ page }) => {
await expect(async () => {
const response = await page.request.get(‘https://api.lambdatest.com/automation/api/v1/platforms’);
expect(response.status()).toBe(200);
}).toPass();
});
Code Walkthrough:
Line 7: It is going to check the expected condition to match, here we have a status code as 200. If suppose we are not receiving the status code as 200, then it will keep retrying until its timeout.
Execution:

For demonstration, I am changing the status code 200 to 201 to mimic a failure. With this, it will keep trying until 30000ms, after which it will fail the test.


Custom Timeout For Retry Intervals
If the expected condition doesn’t match, it will retry for the specified intervals.
Implementation:
const { test } = require(“../lambdatest-setup”);
const { expect } = require(“@playwright/test”);
test(‘Expect Custom Retry test’, async ({ page }) => {
await expect(async () => {
const response = await page.request.get(‘https://api.lambdatest.com/automation/api/v1/platforms’);
expect(response.status()).toBe(200);
}).toPass({
intervals: [1_000, 2_000, 10_000],
timeout: 60_000
});
});
Code Walkthrough:
Line 9: You can specify the custom retry intervals. Probe, wait 1s, probe, wait 2s, probe, wait 10s, probe, wait 10s. Default intervals are [100, 250, 500, 1000].
Execution:

Playwright Locator Assertions
Locator assertions in the tests are provided in LocatorAssertions class. A new instance of LocatorAssertions is created by invoking expect().

For simplification, every Playwright assertion method is explained as an individual test.
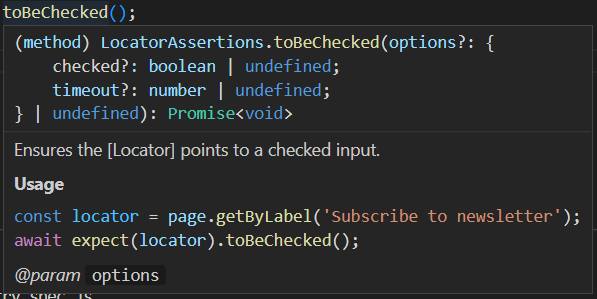
toBeChecked
It’s a way to ensure that the specified locator of the Checkbox type is checked or unchecked.
Sample Usage:
// Example 1
await expect(page.$(“.btn”)).toBeChecked();
// Example 2
const privacyCheckbox = page.locator(“//label[@for=’input-agree’]”);
await expect(privacyCheckbox).toBeChecked();
Parameters:
Implementation:
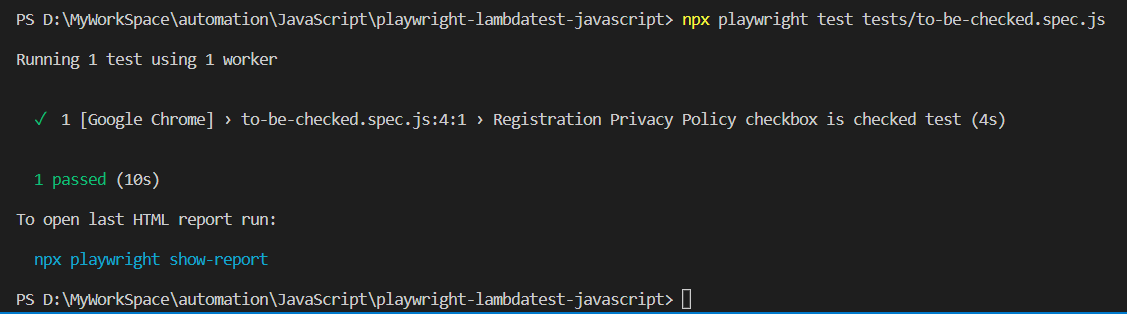
Shown below is an example that demonstrates the usage of toBeChecked expect in Playwright:

const { test } = require(“../lambdatest-setup”);
const { expect } = require(“@playwright/test”);
test(‘Registration Privacy Policy checkbox is checked test’, async ({ page }) => {
await page.goto(‘https://ecommerce-playground.lambdatest.io/index.php?route=account/register’);
const privacyCheckbox = page.locator(“//label[@for=’input-agree’]”);
await privacyCheckbox.click();
await expect(privacyCheckbox).toBeChecked();
});
Code Walkthrough:
Line 1: Importing test, which is called from lambdatest-setup.js file, so that execution can also be done on LambdaTest.
Line 2: Import expect, which is called from @playwright/test.
Line 4: The Test is a block where you will write your test. You can have multiple tests in a spec
Line 5: Navigating to the test URL.
Line 6: The const is created to store locators.
Line 7: Clicking on the Privacy checkbox, as by default, it’s unchecked on the page.
Line 8: The expecting locator to be checked on the page.
Execution:
Here is the execution snapshot, which indicates that no expected condition failed and the specified locator is matched to be checked.
toBeDisabled
It’s used when you want to ensure the locator is disabled, and it will not accept any input or action. Element is disabled if native HTML control has “disabled” attribute. Other disabled attributes will be ignored by the browser.
Sample Usage:
// Example 1
await expect(page.$(“.btn”)).toBeDisabled();
// Example 2
const firstNameLoc = page.locator(“//input[@id=’input-firstname’]”);
await expect(firstNameLoc).toBeDisabled();
Parameters:

Implementation:
Shown below is an example that demonstrates the usage of toBeDisable except in Playwright:

const { test } = require(“../lambdatest-setup”);
const { expect } = require(“@playwright/test”);
test(‘First name field on Registration page to not be disabled test’, async ({ page }) => {
await page.goto(‘https://ecommerce-playground.lambdatest.io/index.php?route=account/register’);
const firstNameLoc = page.locator(“//input[@id=’input-firstname’]”);
await expect(firstNameLoc).not.toBeDisabled();
})
Code Walkthrough:
Line 7: Expect will verify if the element is disabled. In the above example, you will see we are using not because that field is not disabled, so we are verifying negative conditions.
Execution:
Here is the execution snapshot, which indicates that no expected condition failed and the specified locator is matched to be Disabled.

toBeEditable
It’s used to ensure that the specified locator is editable and will accept any input value.
Sample Usage:
const firstNameLoc = page.locator(“//input[@id=’input-firstname’]”);
await expect(firstNameLoc).toBeEditable();
Parameters:

Implementation:
Shown below is an example that demonstrates the usage of toBeEditable expect in Playwright:

const { test } = require(“../lambdatest-setup”);
const { expect } = require(“@playwright/test”);
test(‘First name field on Registration page to be editable test’, async ({ page }) => {
await page.goto(‘https://ecommerce-playground.lambdatest.io/index.php?route=account/register’);
const firstNameLoc = page.locator(“//input[@id=’input-firstname’]”);
await expect(firstNameLoc).toBeEditable();
});
Code Walkthrough:
Line 7: Expect will verify given locator is editable.
Execution:
Here is the execution snapshot, which indicates that no expected condition failed and the specified locator is matched to be Editable.

toBeEnabled
It’s used to ensure the element is enabled further if you want to perform any action.
Sample Usage:
// Example 1
await expect(page).toBeEnabled(“#my-element”)
// Example 2
const continueBtn = page.locator(“input[value=’Continue’]”);
await expect(continueBtn).toBeEnabled();
Parameters:
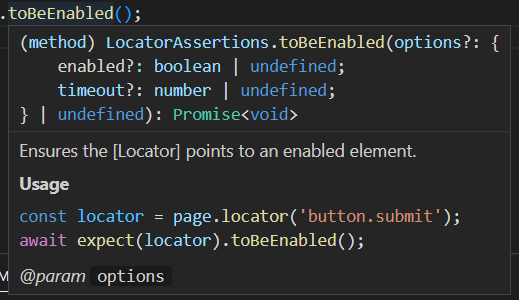
Implementation:
Shown below is an example that demonstrates the usage of toBeEnabled except in Playwright:

const { test } = require(“../lambdatest-setup”);
const { expect } = require(“@playwright/test”);
test(‘Continue button on Registration page to be enabled test’, async ({ page }) => {
await page.goto(‘https://ecommerce-playground.lambdatest.io/index.php?route=account/register’);
const continueBtn = page.locator(“input[value=’Continue’]”);
await expect(continueBtn).toBeEnabled();
});
Code Walkthrough:
Line 7: Expect will verify given locator is enabled.
Execution:
Here is the execution snapshot, which indicates that no expected condition failed and the specified locator is matched to be Enabled.

toBeFocused
It’s used to ensure the locator is focused on the DOM node.
Sample Usage:
// Example 1
await expect(page).toBeDisabled(“#foobar”)
// Example 2
const loc = “//input[@id=’input-firstname’]”;
await page.locator(loc).focus(); // Use this when focus is not on an HTML node.
await expect(page.locator(loc)).toBeFocused();
Parameters:

Implementation:
Shown below is an example that demonstrates the usage of toBeFocused except in Playwright:

const { test } = require(“../lambdatest-setup”);
const { expect } = require(“@playwright/test”);
test(‘Continue button on Registration page to be enabled test’, async ({ page }) => {
await page.goto(‘https://ecommerce-playground.lambdatest.io/index.php?route=account/register’);
const loc = “//input[@id=’input-firstname’]”;
await page.locator(loc).focus();
await expect(page.locator(loc)).toBeFocused();
});
Code Walkthrough:
Line 7: When the focus is not on the HTML DOM node, then use .focus(). If the focus is already there, then you can skip this step.
Line 8: Expect will verify given locator is focused.
Execution:
Here is the execution snapshot, which indicates that no expected condition failed and the specified locator is matched to be Focused.

toBeVisible
It ensures that the specified locator is a visible DOM node.
Sample Usage:
const loginLi = page.locator(“aside[id=’column-right’] a:nth-child(1)”);
await expect(loginLi).toBeVisible();
Parameters:

Implementation:
Shown below is an example that demonstrates the usage of toBeVisible except in Playwright:

const { test } = require(“../lambdatest-setup”);
const { expect } = require(“@playwright/test”);
test(‘Login link is visible on right handside of Registration page’, async ({ page }) => {
await page.goto(‘https://ecommerce-playground.lambdatest.io/index.php?route=account/register’);
const loginLi = page.locator(“aside[id=’column-right’] a:nth-child(1)”);
await expect(loginLi).toBeVisible();
});
Code Walkthrough:
Line 7: Expect will verify given locator is visible DOM node.
Execution:
Here is the execution snapshot, which indicates that no expected condition failed and the specified locator is matched to be Visible.

toContainText
It ensures that the specified locator points to an element that contains given text. You can use regular expressions to verify string and substring.
Sample Usage:
const warningMsg = page.locator(“//div[@class=’alert alert-danger alert-dismissible’]”);
await expect(warningMsg).toContainText(“Warning: You must agree to the Privacy Policy!”);
await expect(warningMsg).toContainText(“agree to the Privacy”);
Parameters:

Implementation:
Shown below is an example that demonstrates the usage of toContainText expect in Playwright:

const { test } = require(“../lambdatest-setup”);
const { expect } = require(“@playwright/test”);
test(‘Registration page validation message to contain text test’, async ({ page }) => {
await page.goto(‘https://ecommerce-playground.lambdatest.io/index.php?route=account/register’);
const continueBtn = page.locator(“//input[@value=’Continue’]”);
await continueBtn.click();
const warningMsg = page.locator(“//div[@class=’alert alert-danger alert-dismissible’]”);
await expect(warningMsg).toContainText(“Warning: You must agree to the Privacy Policy!”);
await expect(warningMsg).toContainText(“agree to the Privacy”);
});
Code Walkthrough:
Line 6: Locator of Continue button is stored in a constant.
Line 7: Click on the Continue button.
Line 8: Locator of Warning message is stored in a constant.
Line 9: Expect will verify given string is present in the locator.
Line 10: Expect will verify given substring is present in the locator.
Execution:
Here is the execution snapshot, which indicates that no expected condition failed and the specified locator is matched to contain text.

toHaveAttribute
It ensures the Locator points to an element with a given attribute.
Sample Usage:
const noNewsLetterSubscribe = page.locator(“#input-newsletter-no”);
await expect(noNewsLetterSubscribe).toHaveAttribute(“type”, “radio”);
Parameters:

Implementation:
Shown below is an example that demonstrates the usage of toHaveAttribute except in Playwright:
const { test } = require(“../lambdatest-setup”);
const { expect } = require(“@playwright/test”);
test(‘Registration page h1 element to have attribute test’, async ({ page }) => {
await page.goto(‘https://ecommerce-playground.lambdatest.io/index.php?route=account/register’);
const noNewsLetterSubscribe = page.locator(“#input-newsletter-no”);
await expect(noNewsLetterSubscribe).toHaveAttribute(“type”, “radio”);
});
Code Walkthrough:
Line 6: Locator of No radio button is stored in a constant.
Line 7: Expect will verify given locator is having type attribute with value as radio.
Execution:
Here is the execution snapshot, which indicates that no expected condition failed and the specified locator is matched to have an attribute.

toHaveClass
This ensures that the locator points to an element with specific CSS classes. It must also be an exact match or use a relaxed regular expression.
Sample Usage:
const h1 = page.locator(“//h1”);
await expect(h1).toHaveClass(“page-title h3”);
Parameters:

Implementation:
Shown below is an example that demonstrates the usage of toHaveClass except in Playwright:

const { test } = require(“../lambdatest-setup”);
const { expect } = require(“@playwright/test”);
test(‘Registration page h1 element to have class test’, async ({ page }) => {
await page.goto(‘https://ecommerce-playground.lambdatest.io/index.php?route=account/register’);
const h1 = page.locator(“//h1”);
await expect(h1).toHaveClass(“page-title h3”);
});
Code Walkthrough:
Line 6: Locator of h1 element is stored in a constant.
Line 7: Expect will verify given locator is class type attribute with value as page-title h3.
Execution:
Here is the execution snapshot, which indicates that no expected condition failed and the specified locator is matched to have class.

toHaveCount
This ensures that Locator finds the exact number of DOM nodes.
Sample Usage:
// Example 1
await expect(page).toHaveCount(“.my-element”, 3);
// Example 2
const formControl = page.locator(“//input[@class=’form-control’]”);
await expect(formControl).toHaveCount(6);
Parameters:

Implementation:
Shown below is an example that demonstrates the usage of toHaveCount except in Playwright:

const { test } = require(“../lambdatest-setup”);
const { expect } = require(“@playwright/test”);
test(‘Form Control occurrences on Registration page test’, async ({ page }) => {
await page.goto(‘https://ecommerce-playground.lambdatest.io/index.php?route=account/register’);
const formControl = page.locator(“//input[@class=’form-control’]”);
await expect(formControl).toHaveCount(6);
});
Code Walkthrough:
Line 6: Locator of form-control element is stored in a constant.
Line 7: Expect will verify given locator occurrences in the DOM node. Here in this example, we have 6 such elements.
Execution:
Here is the execution snapshot, which indicates that no expected condition failed and the specified locator is matched to have count.

toHaveCSS
This ensures that the Locator resolves the element with a specific calculated CSS style.
Sample Usage:
const firstname = page.locator(“#input-firstname”);
await expect(firstname).toHaveCSS(“display”, “block”);
Parameters:

Implementation:
Shown below is an example that demonstrates the usage of toHaveCSS except in Playwright:

const { test } = require(“../lambdatest-setup”);
const { expect } = require(“@playwright/test”);
test(‘First name on Registration page to have CSS test’, async ({ page }) => {
await page.goto(‘https://ecommerce-playground.lambdatest.io/index.php?route=account/register’);
const firstname = page.locator(“#input-firstname”);
await expect(firstname).toHaveCSS(“display”, “block”);
});
Code Walkthrough:
Line 6: The locator of the form-control element is stored in a constant.
Line 7: Expect will verify given locator occurrences in the DOM node. Here in this example, we have 6 such elements.
Execution:
Here is the execution snapshot, which indicates that no expected condition failed and the specified locator is matched to have CSS.

toHaveId
This ensures that the locator points to an element with the given DOM node ID.
Sample Usage:
const firstname = page.locator(“//input[@name=’firstname’]”);
await expect(firstname).toHaveId(“input-firstname”);
Parameters:
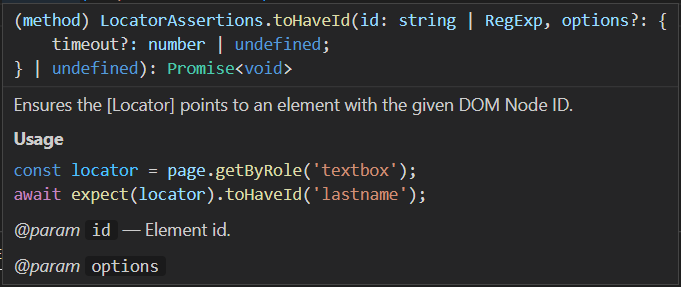
Implementation:
Shown below is an example that demonstrates the usage of toHaveId except in Playwright:

const { test } = require(“../lambdatest-setup”);
const { expect } = require(“@playwright/test”);
test(‘First name on Registration page to have Id test’, async ({ page }) => {
await page.goto(‘https://ecommerce-playground.lambdatest.io/index.php?route=account/register’);
const firstname = page.locator(“//input[@name=’firstname’]”);
await expect(firstname).toHaveId(“input-firstname”);
});
Code Walkthrough:
Line 6: The locator of the firstname element is stored in a constant.
Line 7: Expect will verify given locator has an Id of firstname.
Execution:
Here is the execution snapshot, which indicates that no expected condition failed and the specified locator is matched to have Id.

toHaveText
This ensures that the Locator points to the element with the given text. You can also use regular expressions for the value.
Sample Usage:
const firstname = page.locator(“label[for=’input-firstname’]”);
await expect(firstname).toHaveText(“First Name”);
Parameters:

Implementation:
Shown below is an example that demonstrates the usage of toHaveText except in Playwright:

const { test } = require(“../lambdatest-setup”);
const { expect } = require(“@playwright/test”);
test(‘Registration page is having text First name’, async ({ page }) => {
await page.goto(‘https://ecommerce-playground.lambdatest.io/index.php?route=account/register’);
const firstname = page.locator(“label[for=’input-firstname’]”);
await expect(firstname).toHaveText(“First Name”);
});
Code Walkthrough:
Line 6: The locator of the firstname element is stored in a constant.
Line 7: Expect will verify given locator has text First Name.
Execution:
Here is the execution snapshot, which indicates that no expected condition failed and the specified locator is matched to have text.

toHaveValue
This ensures that the Locator points to the element with the given input value. You can also use regular expressions for the value.
Sample Usage:
const newsletterYesRadio = page.locator(“#input-newsletter-yes”);
await expect(newsletterYesRadio).toHaveValue(“1”);
Parameters:

Implementation:
Shown below is an example that demonstrates the usage of toHaveValue except in Playwright:

const { test } = require(“../lambdatest-setup”);
const { expect } = require(“@playwright/test”);
test(‘Newsletter Yes radio is having value 1’, async ({ page }) => {
await page.goto(‘https://ecommerce-playground.lambdatest.io/index.php?route=account/register’);
const newsletterYesRadio = page.locator(“#input-newsletter-yes”);
await expect(newsletterYesRadio).toHaveValue(“1”);
});
Code Walkthrough:
Line 6: The locator of the Yes radio button is stored in a constant.
Line 7: Expect will verify given locator has value 1.
Execution:
Here is the execution snapshot, which indicates that no expected condition failed and the specified locator is matched to have value.

toHaveValues
This ensures that the locator points to a multi-select box/combo box (i.e., multi-property selection), and the specified values are selected.
Sample Usage:
const countrySelectorLoc = page.locator(“#multi-select”);
await countrySelectorLoc.selectOption([“California”, “Florida”, “New Jersey”]);
await expect(countrySelectorLoc).toHaveValues([/California/, /Florida/, /New Jersey/]);
Parameters:

Implementation:
Shown below is an example that demonstrates the usage of toHaveValues except in Playwright:

const { test } = require(“../lambdatest-setup”);
const { expect } = require(“@playwright/test”);
test(‘Multi Select List of Country’, async ({ page }) => {
await page.goto(‘https://www.lambdatest.com/selenium-playground/select-dropdown-demo’);
const countrySelectorLoc = page.locator(“#multi-select”);
await countrySelectorLoc.selectOption([“California”, “Florida”, “New Jersey”]);
await expect(countrySelectorLoc).toHaveValues([/California/, /Florida/, /New Jersey/]);
});
Code Walkthrough:
Line 6: The locator of the Yes radio button is stored in a constant.
Line 7: Expect will verify given locator has value 1.
Execution:
Here is the execution snapshot, which indicates that no expected condition failed and the specified locator is matched to have values.

Playwright PageAssertions
By using PageAssertions, you can make Playwright assertions about the page state in the tests. It creates a new instance of PageAssertions by calli.ng expect().

Let’s look into some of the PageAssertions types in the sections below.
toHaveTitle
It ensures that the page has the given title. It helps you in adding a verification when you are navigating through the page.
Sample Usage:
await expect(page).toHaveTitle(“Your Store”);
await expect(page).toHaveTitle(/Store/);
Parameters:

Implementation:
Shown below is an example that demonstrates the usage of toHaveTitle expect in Playwright:

const { test } = require(“../lambdatest-setup”);
const { expect } = require(“@playwright/test”);
test(‘homepage has title’, async ({ page }) => {
await page.goto(‘https://ecommerce-playground.lambdatest.io’);
await expect(page).toHaveTitle(“Your Store”);
await expect(page).toHaveTitle(/Store/);
});
Code Walkthrough:
Line 6: It will verify the complete string mentioned in the title.
Line 7: It will verify the part of the string using RegExp.
Execution:
Here is the execution snapshot, which indicates that no expected condition failed and the specified page Title is matched.

toHaveURL
It ensures that the page has the given URL. It helps you in adding a verification when you are navigating through the page.
Sample Usage:
await expect(page).toHaveURL(“https://ecommerce-playground.lambdatest.io”);
await expect(page).toHaveURL(/ecommerce/);
Parameters:

Implementation:
Shown below is an example that demonstrates the usage of toHaveURL expect in Playwright:
const { test } = require(“../lambdatest-setup”);
const { expect } = require(“@playwright/test”);
test(‘LambdaTest Playground URL test’, async ({ page }) => {
await page.goto(‘https://ecommerce-playground.lambdatest.io’);
await expect(page).toHaveURL(“https://ecommerce-playground.lambdatest.io”);
await expect(page).toHaveURL(/ecommerce/);
});
Code Walkthrough:
Line 6: It will verify the complete URL string.
Line 7: It will verify the part of the URL string using RegExp.
Execution:
Here is the execution snapshot, which indicates that no expected condition failed and the specified page URL is matched.

not (Properties)
It checks to ensure the opposite condition. In the above example, you saw that the URL was matched. Now you will see how not is used to check the opposite condition, which should not match.
Sample Usage:
await expect(page).not.toHaveURL(“https://abc.lambdatest.io”);
await expect(page).not.toHaveURL(/404/);
Implementation:
Shown below is an example that demonstrates the usage of not.toHaveURL expect in Playwright:
const { test } = require(“../lambdatest-setup”);
const { expect } = require(“@playwright/test”);
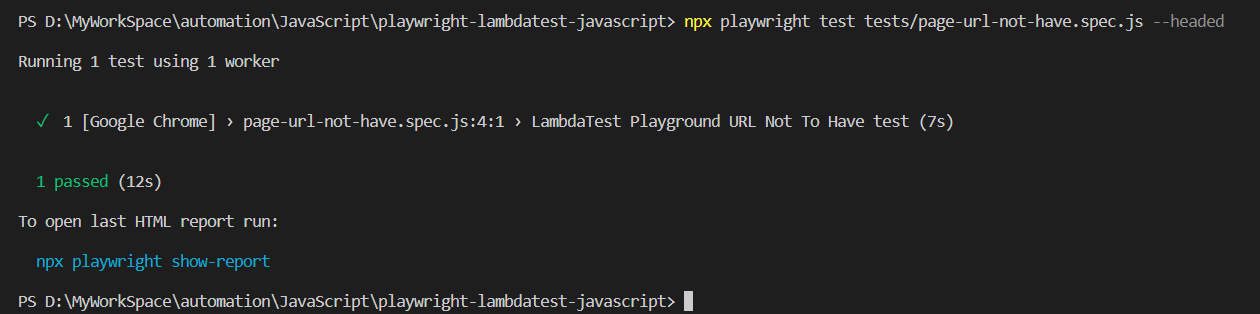
test(‘LambdaTest Playground URL Not To Have test’, async ({ page }) => {
await page.goto(‘https://ecommerce-playground.lambdatest.io’);
await expect(page).not.toHaveURL(“https://abc.lambdatest.io”);
await expect(page).not.toHaveURL(/404/);
});
Code Walkthrough:
Line 6: It will verify the complete URL string doesn’t match.
Line 7: It will verify the part of the URL string that doesn’t match using RegExp.
Execution:
Here is the execution snapshot, which indicates that no expected condition failed and the URL doesn’t match.
Running your Playwright tests on the cloud grid
Cloud-based testing platforms like LambdaTest help you perform Playwright automated testing at scale across 50+ browser versions. You can also run your Playwright automation scripts in parallel and cut down execution times by multiple folds.
Here are some other features that make Playwright testing a breeze with LambdaTest.
- On-demand access to 3000+ real desktop and mobile environments.
- Get 70% faster test execution with HyperExecute – an end-to-end test orchestration cloud.
- Leverage Test At Scale to mitigate test flakiness, shorten job times, and get faster feedback on code changes.
Run Automated Playwright Tests On 50+ Browser & OS Combinations Online🎭 | LambdaTest
You can also subscribe to the LambdaTest YouTube Channel and stay updated with the latest tutorial around Playwright browser testing, Cypress E2E testing, Mobile App Testing, and more.
To execute the test on LambdaTest, we will add a script in package.json with a few other minor changes like description and keywords. However, it’s optional.
{
“name”: “playwright-lambdatest-javascript”,
“version”: “1.0.0”,
“description”: “This is Test Automation framework designed using Playwright, and JavaScript to execute on LambdaTest”,
“main”: “index.js”,
“scripts”: {
“clean”: “rimraf playwright-report && rimraf allure-results && rimraf allure-report”,
“test”: “npm run clean && npx playwright test”,
“lambdatest”: “npm run clean && npx playwright test –config=./lambdatest.config.js –reporter=line,html,allure-playwright”,
“allure-report”: “npx allure generate ./allure-results && allure open”
},
“keywords”: [
“node”,
“javascript”,
“allure-report”,
“rimraf”,
“lambdatest”,
“allure-reporting”,
“playwright-tests”,
“lambdatest-playwright”
],
“author”: “Code with MMAK”,
“license”: “ISC”,
“devDependencies”: {
“@playwright/test”: “^1.29.2”,
“allure-commandline”: “^2.20.1”,
“allure-playwright”: “^2.0.0-beta.23”,
“playwright”: “^1.29.2”,
“rimraf”: “^3.0.2”
}
}
With all configuration done, now to run the test on LambdaTest Cloud type npm run lambdatest on the terminal.
You will see that test execution starts and the status of each test will be reported in the terminal, and default HTML report.
Terminal Results:

Default HTML Report:
Go to the Project root directory: ./playwright-report/index.html and open the HTML report.

Result on LambdaTest Dashboard:

Expanded view of test result:

Conclusion
You now might have a fair understanding of how Playwright assertions or expect work. Also, you saw how you could run the tests on a cloud grid. The tester should only worry about the tests, not the test configuration and maintenance. With the cloud grid solution, you can run the tests on almost all the browser and OS configurations without you being worried about how to maintain them.
Furthermore, it allows you to run tests in parallel, which cuts the time and cost so that you can write more effective tests.
What Do You Think?
- Did this work for you?
- Could I have done something better?
- Have I missed something?
Please share your thoughts and let me know if there are particular things that you would enjoy reading further.
Cheers!